Rickesh Gurung
final major project
DOCUMENTING PROCESS
Context: these are the ideas and plans I’m thinking of doing for my FMP. All of the information are contained in the video.

This is an (unfinished) model of an imaginary city i have created which is linked to the story that i will be presenting on my FMP. Reflecting back on my “Maya Robot” project. I did really bad as it was my first time using maya and i had little to no interest in modelling which affected my final product and my grade on that project. Therefore i am doing this in my own free time to show that i can indeed model 3D objects and make interesting things out of it. I am also doing this to show off the skills i have obtained from Joe’s lessons and his teachings and applying all of that into my FMP. Most importantly showing appreciation and thankfulness to Joe, Matt and the other teachers, staff and friends for teaching me and helping me out when i was highly lacking in skills in these areas. This part/ scene that i am creating will play a heavy roll in my FMP and the story that it holds so that it doesn’t appear as i am doing this to just show that i did it. I really hope that this scene will make it to the final cut of the FMP.

Storyboarding:
This is my first time seriously doing a storyboard. This scene will be a part of the intro for my FMP as i am using this section to set up the main climax that will occur later in the video. Essentially this is just a set up scene to make the events that will happen, more impactful as well as to cover the lore and backstory before jumping straight into the main course. This segment of the video will also allow me to implement character development in order to show light and personality to the main character.

Storyboarding Vol. 2:
This is a follow up to my first post about storyboarding which was also my first attempt doing a professional looking storyboarding that contained crucial information on how the scene will be shot. For example how the camera will move in space (camera movements: panning, zooming in, etc.) This can be shown by drawing arrows that shows the direction the camera will move and so on.
I have also added a short description below the scene which tells me what the scene is meant to represent or meant to be. This allows me to remind myself of any emotions needed that the actor should act out for that scene individually depending on what the scene is about so that it gives the scene more of an emotional impact to the viewers instead of the actors being an emotionless characters on a blank canvas.
Different shades of black and grey represents silhouettes and shadows cast on the object or the actor. Which is a clear representation of the lightings and how/where it is placed in the scene. This however can be changed or altered depending on the camera or the performers’ actions or movements. The lightings can also be changed if the scene is too dark or bright when looked through the lens of the camera as we can never or it is hard to predict how the image is going to look on the screen of the camera.
Dialogues are also added on the storyboard just incase if the script is unavailable to be obtained at that period of time or situation. This is mainly a safety precaution to prevent any mistakes or misinformation for the actor.
26-3-2019
Working with other content creators:
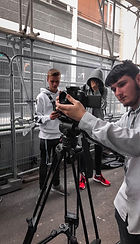
This video is a experimental fashion ad/ campaign that my friend shot and edited. Even though the product itself isn’t related to my FMP, the process of making it is really important as i need the experience working with other people. A lot of my previous projects i have always been the one directing,acting and editing. This mini project my friend and I did allowed me to work on the other side of the spectrum which was to act and to experience receiving directions from other people.
Things I learned: using music and transitions in sync to make full use of the effects i have trying to present to the audience and how i want them to feel. And using music properly to its advantage to sell the effect or transitions and more impactful.
Other small useful tips i learned: Before doing this mini project, i would always use my hands as a form of gimbal which has worked perfectly for me. As i am known for having the most stable hands. However looking back at the shoots we took, it amazes me on how smooth and professional looking the video turned out to be using a gimbal.
27-3-2019

UPDATE: blender modeling
This is part of my evidence in recording and keeping track of my process
Section one: Making a 3D world intro
This section of my FMP will/is going to be the intro that ties in and sets up the story going forward. The previous post on my 3D world modeling progress; i was modeling the 3D world, creating roads, buildings, cars and other structures that would be in a typical city.
Currently i have just finished texturing and adding lights to my structures to give it life and character. My next post will include how and where i got the inspiration from and how i was able to implement different inspired elements into my own work/city.
Extra things i added: After i had the plain map and structures already modeled and ready. The next step i went ahead and did was to add details to the structures. For example: adding windows on the buildings and painting the road. This allowed the structures to look realistic and believable, even tho I’m going for a fictional world that takes place in the far future where technology is far advanced. However i wanted to build and create upon existing structures and artifacts in the current real world as I don’t want the viewer to be confused with what the structures are supposed to be. This basically means making normally shaped buildings and streets look technologically advanced with neon lights and holograms to represent the future.
Obstacles that i faced: modeling and detailing each single structure one by one was really time consuming. To combat that problem, i copy and pasted some of the buildings with the details on it to save time and effort but spread it out so it doesn’t look repetitive. However i tried to make the city as diverse as i can with unique structures and details on it.
Second solution to saving time was to leave the areas that the camera will not capture, for example the roof top and the top part of the buildings. I modeled those part as a reference point but left the detailing part as the camera was not going to capture it anyways so there was no point in designing and detailing those areas.
27-3-2019
Research & Inspiration:

Research & Inspiration: Intro for my FMP
I remember watching this movie on the TV with my dad when i was really young who just wanted to see cool super hero and fantasy worlds. At that time i didn’t care about how good the plot or the story was since i would have to ask my dad every second about the villain’s morals and why they are doing what they are doing. I enjoyed watching the movie solely on it’s visuals and how it made me feel. I rewatched the movie back in 2015 again (I was 13 at this time) because the movie was really memorial to me. I watched the movie again for the 3rd time couple of days ago. I had to put on my analytic face to really see if the movie is actually a good movie or if it’s just because i was young and i liked everything that looks flashy.
To my surprise, i really like the movie not only for its visuals but for its story and the characters in it. All of the characters were memorable that had personality. I really dig the story as a whole and why things are happening. I was really invested with the characters. The villain of the movie “Clu” wasn’t any cliche antagonist, but someone who’s morals were scarier than themselves. Clu wasn’t any super villain that can one shot the protagonist and looked scary in any way. It’s what he believes in and his doings that made him scary.
CGI & VFX: Tron Legacy is one those CGI and VFX heavy movies that requires such level of editing and visual storytelling to tell and further express the plot in a way that wasn’t done most of the time. The CGI work on “Clu” was slightly poor compared to todays standards however for a movie that came out in 2010, it is pretty impressive and most of the time you couldn’t even tell.

How Tron Legacy inspired me:
The whole futuristic world of “The Grid” amazes me on how real it looks in terms of executing and selling that the characters are actually stuck in this fictional world. From the acting to the real Tron suits that they made for the actor and actresses for them to use on set really worked to sell that they are indeed in this world. I am really into neon lights and the aesthetic/vibe it gives as well as the ways it could be used as visual storytelling to express your story. So from the beginning i already knew i was going to like the movie before watching it for it’s visuals. Therefore for my intro, i created a fictional city that resembles “The Grid” as well as maintaining the current features of a modern city building.
How i made the city:
I made the city using blender 2.8. The process of making the city are shown on my previous post. The things i added on my city to resemble “The Grid” is neon lights and bright billboards on the buildings and the streets. I am still working on the city and the progress is still continuing…
28/3/2019
Research/Analysis: Usage of Color in Film

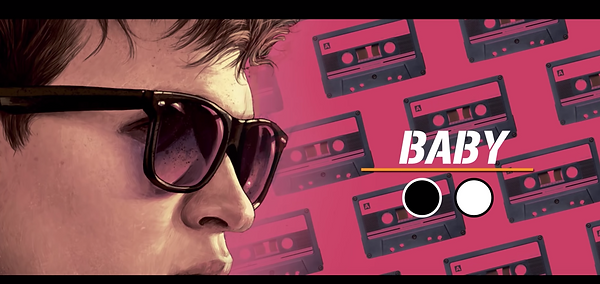
Using colour to your advantage to further expand on story: (Baby Driver)
I will be analysing how colours are used in the movie: Baby Driver as a form of story telling technique as well as using it to give each character their own individual personality.
*Color coding characters in order to tell the audience more about the character’s personality and what they represents.*
Main Protagonist:
In the entirety of the movie we follow Baby and we as the audience look through his lens. Baby is dressed mostly in black and white, which suggests the life he is living right now. Black representing the darkness of the criminal underworld against the lightness of him taking care of his foster father and his new found romantic relationship with Debora. In addition to that, it literally reflects to the fantasied black and white world that Baby wants to live. Which is also a metaphor to life being easy as black and white, in other words, not complicated nor hard. However it is the direct contradiction to the life of crime that he is getting involved with. He often refuses to witness the crime committed by his fellow crew members because he himself is a good person drawn into this mess. Going as far as to even prevent some casualties to save an innocent victim’s life. But there ends up being a lack of consequences for Baby, until he finds someone or something to care for enough to fear losing. The black and white also represents the boring “Black and White” life that he lives like he is living in the same loop over and over again.
Get coffee in the morning, another meeting, another job without any further step or image of the future outside of that loop until he meets Debora. All of his crewman don’t mind violence, some even enjoy doing it. This is one of many reasons why Baby do not go along with the rest of the crew as all he wants to do is pay back what he owns. One way it suggests that is he is the only one without a coffee at the meetings but the one getting it for them. Which also shows that without Baby all of the heist wouldn’t have been possible, and everyone needs him to be there as the getaway driver. Just the getaway driver.
Baby’s costume design fits into the monochrome aesthetic for most of his scene whereas the rest of the cast are dressed in bold, vibrant colours. It singles him out visually even if there was no sound or dialogues in the movie.
Costumes are just another opportunity for communicating ideas or theme designed by the hands of someone as detail oriented as Edgar Wright (Director).
The Director worked closely with the costume designer for the movie to give each character their unique look, with one notable exception.
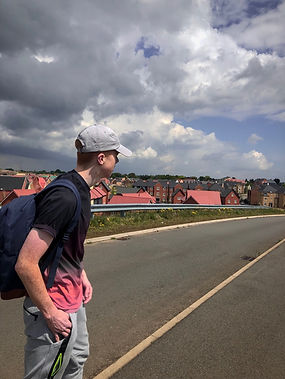
INTRO MOCK UP SCENE
Intro Scene Practice Sequence:
This scene will be the first section of my FMP, used as the set up sequence for the main section.
I tried implementing the 180 film technique by always keeping the camera on one side of the spectrum. I broke and blend the rule here and there but for my first try, it didn’t look that bad i guess.
This practice session was manly to check how the shots will look in relation to the environment and the lighting conditions. The lighting is really important for this sequence as if the sun is out and the light is really harsh, it could ruin my shot as I am going for a dark and uncomforting aesthetic.
Color Grading:
This part of the scene will take place in the current timeline which is the future (2049). To represent this timeline, i will be using cold colours like blue and green. To represent the past, i will be using warmer colours like orange and golden. I want the audience to feel disgusted when they see the scenes of the future which is a representation of the current state of the world. When they see the past, i want them to feel comfortable and welcoming.
Things to improve:
I realised the whole time, the shots were out of focus. Even though this is the camera operator’s fault, as the director i should be reminding and making sure the focus and other camera settings are set before shooting.
Real Sequence:
On the actual scene, i wouldn’t be surprised if i will be changing some of the shot sizes as well as the angles.
Plot Hole:
You will never find out what Wyn saw…
4-4-2019
UPDATE: Blender intro progress

New things that i added:
More buildings have been added with different types of design to avoid repetition. I experimented with the lightings and the placements of the tron neon lights in stylish ways that is unique and new. For example creating an external bevel on the edge of a building that i can put a neon light onto or extrude the shape to create interesting structures. If the building looks weird then I am probably doing a good job modeling these futuristic buildings as they should be things that u have never seen before cause it takes place in the future. I also added spot lights to lit some areas between buildings and on street lamps.
Other Extra things i added:
I added reflections on the buildings and the roads so that the light reflects and bounces. The reason why i added the reflection effect on the road is because it is not concrete material. This road is electric generated and powered by kinetic energy from the cars and the solar panels. These cars no longer need fuel or gas to power and run, they are electrically powered by the roads themselves. They are self driven as well to ease the driver’s driving experience and accessibility as well as reduce road accidents to 1%.
Fine attention to detail:
Details are really important to me even though this scene is about 8-10 seconds long so the details don’t matter as much. However i wanted those people who do go out of their ways to look for the details in the scene by pausing the video or observing carefully, to be satisfied and amazed by the small details added. Some examples of these details being visible are in the building windows, the road and the street lamps. If you look carefully, the streaks lamps are constructed in a complex way that is unique and interesting.
5-4-2019
UPDATE: Blender Intro Modeling

New things i have added:
I have expanded my 3D world with new structures that gives the world more character and realism. This part of the world is mostly pink and purple showing separation as a biome. This part of the city includes hotels, strip clubs and so on.
Extra details i have added:
I did some experimenting with the lightings such as adding different types of lighting to light up my scene. For example i added multiple area lights on the JOI model to light her up so that she is visible however I don’t want to over do this to avoid making it look unrealistic.
I have also added this huge pink sun for aesthetic purposes giving it the retro 80s game vibe. There is a hologram of the earth as well on top of one of the buildings just for an extra touch. The road is extended further for the camera to follow up.
Color:
I specifically chose the color pink for this section of the world because it is the opposite of blue in terms of how these colors represent gender. Buildings with blue color lights are mostly business and residential buildings and structures with pink lightings are mostly luxury hotels and entertainment buildings.
Camera animation:
The final step of the production for this intro is to animate the camera to mimic a drone or a gimbal. This section is still under construction therefore I cannot provide any ground evidence.
6-4-2019
COLOUR GRADING
Couple of days ago i experimented with using flat picture profile while shooting the intro segment of my FMP. These are clips of the shots side by side with flat picture profile and color graded.
What is flat picture profile:
Flat picture profile, also known as LOG is a setting in the camera that allows the camera to capture the image at a higher dynamic range. This is important because camera with higher dynamic range can capture images balancing out both highlights and the shadows without one or the other looking blown out or under exposed. Therefore the LOG footage looks de- saturated and ugly while you’re shooting the footage however when you’re grading it in post, you will get a wider flexibility on how you want the image to look as you have more control over the footage because there is more important there. The more dynamic range there is, the more cinematic the footage will look as LOG setting is used in every hollywood movie to capture every single detail.
How I achieved this:
First and most importantly, I color corrected all the clips using the basic color correction tool on premiere pro where i can tweak and change all the basic elements on the clips for example the exposure, highlights and contrast. This part of the process is really important before slapping on the pre-made LUT color pack because the image should be corrected first. After that i chose what LUT i wanted to use, in this case i used the “Matrix Blue” pallet and chnaged the intensity of the effect to my desire. Changing the intensity is also important because beginner filmmakers and editor forget about this part and their footage ends up looking over done and not realistic.
// Ending Scene Test //


Last Wednesday me and my film crew booked the equipment we needed and even had an induction on the Goddess C100. After the induction i was able to hold the holiness of the C100 with my naked hands. We got the glide rail out as well as lighting equipment such as LED lights with defusers and reflectors.
Shots i needed:
A very slow track of my back moving backwards while keeping me in the middle as well as maintaining symmetry on both sides. This shot is used for the end sequence therefore the shot is being slow and steady giving the audience the opportunity to digest the information and understand the visual story. This shot is also used to show realization in the character and what’s happening around him. Overall this scene as a whole is used to give the character and the audience a chance to breathe and take in the surrounding and events that has occurred.
Problems we faced:
Setting up the glide rail was really hard and time consuming. We didn’t have the correct plates for the tripods that goes into the glide rail. To overcome this problem we had to manually move the glide rail as well as hold the glide rail and the tripod together which Ryan helpfully did and Deimo did the movements with the C100 and the actual glide rail.
Problems I Faced In Post production:
When i was editing the clip, the shot was not focused all the way in. This is because when we were looking at the playback display the shot looked perfectly focused since the screen is small.
Things i learned // what i could improve:
Next time we are doing this scene/shot i could bring in my laptop with me and plug in the HTMI cable straight from the camera to my laptop to view the shot in real time with a bigger screen to spot any mistakes. If that plan doesn’t work out, we could use the magnifying tool in the C100 to double check the shot is in focus or not.
TEASER TRAILER
This is a Teaser Trailer i made for my FMP:
This video shows less but more at the same time. The title of the Short Film is “My Year 2018/Time”. This allows the viewers to better understand what to expect when the actual video comes out. The color grading and visuals sets the tone of the video going towards. These tiny details are straight giveaways in terms of the plot and the story if seen closely. Everything from every clip to every shot and angle is used to foreshadow future events. It is also used as a metaphor to represent greater meaning and value.
Ending Scene: 2nd Try

This is me and my film crew re-shooting the ending scene for the second time with better understanding and knowledge which we learned from our mistakes in the last shoot. This time we took out the track and dolly from the college student resources room, lenses from the library (11-16mm wide angle lens and 50mm prime lens) and Canon 650D from the media room. After getting all the equipment, we immediately started setting up ready for the shoot as of us knew what we wanted and how we wanted the shot to look like. We added an extra crew member “Sam” for this shoot to help us set up the track and dolly for maximize efficiency.

Problems we faced:
For the first shot we had to put the focus on manual because for some reason the auto focus feature didn’t work as well. In doing so, we created new problem for ourself. While pulling back the camera on manual focus, focusing on the actor the camera loses focus as the camera moves further away from the focus point. We could’ve fixed this problem by manual turning the focus wheel while moving backwards however this could be risky as we did not have an external focus wheel big enough like in real Hollywood product and turning the focus wheel while moving backwards will be a hard job to do.
Technical knowledge:
For the first shot i wanted a buttery smooth blurred background (depth of field). This was achieved by using the 50mm prime lens, which can go down to 1.8 f-stop. For the second shot i used the wide angle lens to get more of the background and the surrounding as well as the actor.

Track and Dolly:
The track and dolly was used to create this effect of slowly moving the camera away from the actor. This is used as a metaphor to show that the audience is slowly moving away from the actor losing feelings and attachment for the character. As well as the character literally being small and vulnerable as the camera moves away.
Which is why I made the decision to left this shot untouched and embraced the fact that the shot is out of focus shot. I left the shot how it is for aesthetic reasons and also to represent the vision literally being blurry as the camera moves away from the character/ focus point. As for the whole movie, we looked through the character’s perspective and in the ending scene we move away from the focus of the movie and we lose focus of our perspective as we slowly move away
PROMOTIONAL PICTURES FOR SURVEY


Primary research:
Today I finally decided to make my “first ever” survey on surveymonkey.com. I have collected answers to the questions relating to my FMP which will help me out on what the viewers want and what their interests are.
I also made this image on photoshop kindly telling people to take the survey. I made 2 of them, one for instagram story and one for snapchat. This are the two platforms I choose to present my survey as i have a large following and audience in these platforms and they allow the users to add links in theirs stories as well which is really helpful. This can save me time from individually sending out links to everyone.
This is me acting/featuring in one of my friend’s practice video. In this video he was using a hand-held gimbal along with this sony a6000 to get this smooth footage.
As this is a cinematic sequence, just using slow motion (However the whole video was shot in 60fps) is boring and thats the last thing we want the audience to feel while watching this. Therefore we added lots of in camera transitions like camera blocking and quick wipes using existing objects. We also decided to add quick speed ramps here and there to mix it up.
Location scouting:
For the first 30 or more minutes, we were walking around looking for the perfect location and we found this small lake with a little broken down house/shed. All thought we didn’t think of a story or planned anything beforehand, we just decided to go with the flow.
Therefore, we were going for a relaxing vibe that matches the whole location and aesthetic. It looks as if i just came home from a hard job and I’m sitting down reflecting on my day and relaxing down looking at the sun set. We actually planned ahead of time to be able to capture and shoot in the “golden hour”.
For something we didn’t even plan for, i think this cinematic sequence is perfect and i hate to say it but I wouldn’t change a single thing. As we all worked with what we got at that time. This experimental project was totally worth the time.
Things i learned:
i briefly learned how to use my friend’s gimbal which was really fun. This video and the last experimental video was shot on the same day therefore i am seen wearing the same outfit. If i were to change anything, i think i would change my outfit on the first video/location to have diversity and prevent repetition as i had a bag full of clothes but since we were on the go one after another, i didn’t have time to change up.
Gear used:
Camera: Sony a6000
Lenses: Sigma 30mm
: Sony 16-50mm
Gimbal: Zhiyun crane plus
PROM LAMBORGHINI SCENE

I am still debating to either put this in my final product or not as it might turn out to look the way i don’t want it to be.
I want this scene to look realistic like how car advertisements look. This scene is meant to be a Lamborghini driving me to the prom. If this scene doesn’t work then this will turn out to be a whole experimental scene since anything can happen at this point.

Special sound effects will be added to sell the effect like led light flickers, sound of a real Lamborghini driving, sound of other cars on the highway and etc.

To make this scene look realistic, i took reference pictures of real life roads which will help me out a lot.
Things that can affect how this scene will look:
I am still a beginner in blender as i started using blender few months ago therefore i still don’t know the most efficient ways to work around the software which I’m still working on improving. However i might not have time to learn and execute this since this is not the only thing i am doing for my FMP.
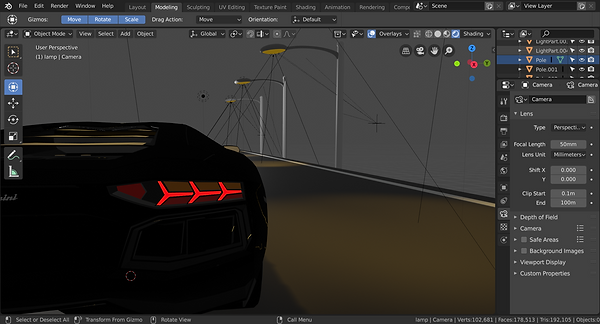
Things i added in the scene:
The main foundation was first made which is the road/ highway itself for the cars to drive on. After that i went ahead and added car models which i later had to painstakingly paint everything from the wheels, the body to individual parts (this part of the process was really time consuming). To make the cars look realistic, i searched up the same car in real life and tried painting and matching every part and features on the car. After that i had to turn down the roughness of the car body and rims so that light can reflect and bounce off of it like how a real car would.
Next, i proceeded to add more cars and do the same process all over again. I added street lamps as well with lights on it so that it can hit and bounce off the car’s roof and windshields. Tunnels with interior lights were manually made as well just for an extra bonus scene.
What i am thinking of doing next:
I am thinking of making the roads wet, by adding little puddles here and there to further make the scene look realistic. As well as adding some dust and rubbish build up on the corner of the roads as in real life roads are not 100% clean and flat. I am still learning how to do this so it might take a while.
LOCATION SCOUTING

For the last couple of weeks, i have been working closely with my friend Adam acting for his FMP in a music video. A lot of time we take time off of our week to go out exploring for locations to shoot in. We do this so we can have more options to work with and locations to juggle. Most of the time we only use a location once, meaning we won’t reuse the same location for a whole different project. This is because we both want something new every time and not to only limit ourself to one perfect location.
Process to finding the perfect location:
First we discuss where we want to go beforehand on text. This can a place as a whole to explore or a specific location in mind that would look good through the lenses. After that we meet up the next day with our gear ready to shoot, we plan ahead on what shots to take and how we are going to take it. Even if we don’t know much about the location it is really important that one or both of us have a rough visual in our head on how we want the shot to look like. Then once we are at the location we adapt to the situation and work with the location like water being poured in an container and how the water takes the containers shape and formation.
Once we are at the location and we have taken all the “main” shots we need; most of the time at this point of the process, we take experimental shots and extra “B-roll” as it is better to over shoot then undershot so we have more flexibility in the editing room.
Tricks we used in location:
To prevent repetition, we basically flip the side we were shooting on so we have a different background or move to the side to avoid all the shots in that segment looking the same. We will obviously take different shot angles and sizes as well in that process. In a single music video, I personally go for 3-4 totally different location with 2-3 different outfits, this just makes the video flow better as avoiding repetition keeps the audience engaged. This will take around 2-3 days worth of shooting. The 4th day is optional as at the end of the 3rd day is used to reflect on our shots since we would’ve already done a rough cut of the music video. 4th day is used to re shoot shots and fix mistakes or shoot extra shots.
Photo Reference:
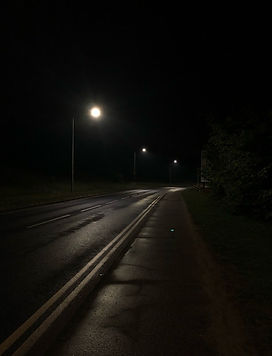
I was out for the night, when i was coming back home. I decided to take some shots of my neighborhood to use as a reference for my “Lamborghini highway” scene.

The floors were wet and the reflections were beautiful which made the shot automatic less basic. In real Hollywood production when they are shooting night scenes they purposely wet the floor using a hose to get the light reflection on the puddles created by the water and the potholes.

I am making this “Lamborghini highway” scene on blender and everything is going to be modeled in 3D so its really important for me to make this scene look as realistic as i can. I will try to create potholes and puddles on the highway with little patches of grass and dirt on the corner of the highway. I am still at the thought process with adding these details as i have already created the foundations.
These reference pictures allowed me to see how real roads look like at night and the lamps as well. How the light looks and how the cars reflects lights off the windshield and the roof. This reference picture is better than my last one as this one is actually in night time and i can see how the street lights works in terms of how much light is projected and the beam/cone of light and the light spread. These things are important to make a 3D scene look realistic which is the main goal.


Photoshoot for the poster and the thumbnail of the video